Downsampling point clouds with PCL

PCL (Point Cloud Library) offers two ways that I know of to downsample a point cloud to a more manageable size.

The first uses pcl::VoxelGrid, and the second uses pcl::octree::OctreePointCloudVoxelCentroid.

They are both simple to use:

pcl::VoxelGrid

using Point = pcl::PointXYZ;
using Cloud = pcl::PointCloud<Point>;

float leaf = 1.f;
pcl::VoxelGrid<Point> vg;
vg.setInputCloud(input);
vg.setLeafSize(leaf, leaf, leaf);
Cloud::Ptr output(new Cloud);
vg.filter(*output);

Here we create the filtering object, give it an input cloud to work on, give it the only parameter it requires, `leaf` being the voxel dimension, and filter it to a new output cloud.

The size of the resultant output cloud is dependent on the leaf size.

pcl::octree::OctreePointCloudVoxelCentroid

float leaf = 1.f;
pcl::octree::OctreePointCloudVoxelCentroid octree(leaf);
octree.setInputCloud(input);
octree.defineBoundingBox();
octree.addPointsFromInputCloud();
pcl::octree::OctreePointCloud::AlignedPointTVector centroids;
octree.getVoxelCentroids(centroids);

Cloud::Ptr output(new Cloud);
output->points.assign(centroids.begin(), centroids.end());
output->width = uint32_t(centroids.size());
output->height = 1;
output->is_dense = true;

Here we create an octree initialised with it’s voxel dimension, give it an input cloud to work with, and get back a vector of the centroids of all possible voxels. This vector can then be used to construct a new cloud.

Convergence

In both cases the size of the output cloud is unknown beforehand. It’s dependent on the choice made for the voxel leaf dimension. Only after downsampling can you query the cloud for it’s size.

An iterative method is needed if you want to end up with a given size: You can perform one of the downsampling methods, and based on the resultant output size, adjust leaf up or down and do it again. Stop iterating when the output cloud size converges to within a tolerance of a required size or percentage of the input.

I do this for both methods in my hobby project of pcl-tools.


Concave Hull

I actually fully completed a side project for a change. Concave is a program that computes the concave hull of a set of points. Points such as from a Lidar survey.

The program, performance and algorithm is fully described in the codeproject.com article I published about it.

Stand out obvious to me, was that taking on this project was a prime example of the Pareto principle, aka 80/20 principle where:

  • Only 20% of the time and work was taken to get a functional and working program that fully satisfied my curiosity. I could have left it at that, and I normally do.
  • The remaining 80% of the time was refining, profiling, measuring benchmarks, finishing touches, preparing an article, and everything that makes it more than just a hobby program.

This was a very satisfying project for me for various reasons. It interests me; It potentially has uses in my day job; It’s a good demo of my C++ and STL programming skills. Adds to the portfolio of my career.

The code is on my github.

Building Clipper with CMake

I had a problem with building Clipper 6.4.2 using CMake where I’d get the following configuration error:

CMake Error at CMakeLists.txt:18 (INSTALL):
  install TARGETS given no ARCHIVE DESTINATION for static library target
  "polyclipping".

This was irrespective of whether I chose to build a shared library (.dll/.so) or a static one (.lib/.a).

The CMakeLists.txt file that comes with version 6.4.2 looks as follows:

CMAKE_MINIMUM_REQUIRED(VERSION 2.6.0)
PROJECT(polyclipping)

SET(CMAKE_BUILD_TYPE "Release" CACHE STRING "Release type")
# The header name clipper.hpp is too generic, so install in a subdirectory
SET(CMAKE_INSTALL_INCDIR "${CMAKE_INSTALL_PREFIX}/include/polyclipping")
SET(CMAKE_INSTALL_LIBDIR "${CMAKE_INSTALL_PREFIX}/lib${LIB_SUFFIX}")
SET(CMAKE_INSTALL_PKGCONFIGDIR "${CMAKE_INSTALL_PREFIX}/share/pkgconfig")
SET(PCFILE "${CMAKE_CURRENT_BINARY_DIR}/polyclipping.pc")

SET(BUILD_SHARED_LIBS ON CACHE BOOL
"Build shared libraries (.dll/.so) instead of static ones (.lib/.a)")
ADD_LIBRARY(polyclipping clipper.cpp)

CONFIGURE_FILE (polyclipping.pc.cmakein "${PCFILE}" @ONLY)

INSTALL (FILES clipper.hpp DESTINATION "${CMAKE_INSTALL_INCDIR}")
INSTALL (TARGETS polyclipping LIBRARY DESTINATION "${CMAKE_INSTALL_LIBDIR}")
INSTALL (FILES "${PCFILE}" DESTINATION "${CMAKE_INSTALL_PKGCONFIGDIR}")

SET_TARGET_PROPERTIES(polyclipping PROPERTIES VERSION 22.0.0 SOVERSION 22 )

The offending line is emphasized in bold. This is insufficient according to this StackOverflow post.

I edited the line as follows:

INSTALL (TARGETS polyclipping
         ARCHIVE DESTINATION "${CMAKE_INSTALL_LIBDIR}"
         LIBRARY DESTINATION "${CMAKE_INSTALL_LIBDIR}"
         RUNTIME DESTINATION "${CMAKE_INSTALL_BINDIR}")

And configuration succeeded.

365 day time lapse with a raspberry pi

I set out to make a time lapse video covering a year of foliage changes in the garden of the apartment block where I live. I used a Raspberry Pi with a camera module.

It took six photos each day, and at the same times each day. 12pm, 12.30pm, 1pm, 1.30pm, 2pm, 2.30pm. My thinking was that I’d pick the best photo for each day. In the end I chose images of one time slot instead. The photos are then merged into a video.

https://youtu.be/PX6UJ-aZOW0

This post details the making of the video, mostly for me to have a record of the commands and settings I used.

Enclosure

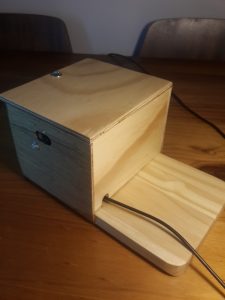
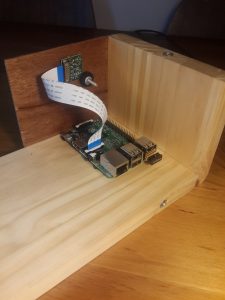
Its vitally important that the camera module doesn’t move at all over the course of the time lapse. For this, I made an enclosure for the Pi to be installed in the window aperture. The camera module is positioned behind a hole in the side.Enclosure opened with Pi and camera module
Enclosure closed with camera opening visible

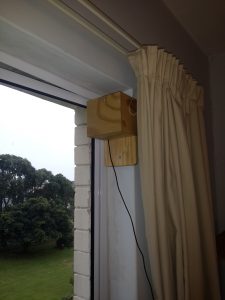
Enclosure installed in the window aperture

Setup and networking

I wanted the Pi connected to my home WiFi network in order to communicate with it, and for it to be internet enabled for progress emails. I used a WiFi dongle for this and mostly just followed the instructions here: Automatically Connect a Raspberry Pi to a Wifi Network

Taking a photo

The built-in raspistill command is used. Support for the camera module is enabled when the Pi is first setup with raspi-config.

The script that takes the photo looks like this:

#!/bin/bash
#Filename: photo.sh

DATE=$(date +"%Y%m%d_%H%M")
raspistill -o /home/pi/images/$DATE.jpg

This takes a photo and stores it in an images directory with a filename formatted with the date and time of the image.

Make thumbnails of the daily photos

I wanted a daily email of thumbnails of the photos taken. Part of the imagemagick suite of tools is convert which does this.

sudo apt-get install imagemagick

#!/bin/bash
#Filename: thumbnail.sh

DATE=$(date +"%Y%m%d")
SRC_DIR=/home/pi/images
TRG_DIR=/home/pi/thumbnails
IMAGES="`echo "$SRC_DIR"/"$DATE"_*.jpg`"
convert $IMAGES -strip -thumbnail 7% -append $TRG_DIR/$DATE.jpg

Here, a set of photos is stripped of anything redundant, reduced in size, sequenced top-to-bottom and a copy stored in another directory.

Backup the daily photos to a USB drive

Just in case anything went wrong I wanted a backup copy of the photos. For this I used a USB drive permanently inserted into the Pi and used rsync as the easiest way to copy only new files.

sudo apt-get install rsync

#!/bin/bash
#Filename: backup.sh

DEST=/mnt/usb
if ! /bin/mountpoint -q $DEST; then
sudo mount -o uid=pi,gid=pi /dev/sda1 $DEST
fi
if /bin/mountpoint -q $DEST; then
/usr/bin/rsync -auW /home/pi/images $DEST
fi

Here, if the destination is not already a mount point, the drive will be mounted. Then the contents of the images directory gets rsync‘ed to the mounted drive. The drive will stay mounted until the Pi is switched off.

Local storage capacity considerations

With each photo being about 4.5Mb, 6 photos a day for a year would lead to running out of space both on the Pi’s internal storage as well as the USB backup drive. So I wanted to determine daily the current disk usage. The df command was used.

#!/bin/bash
#Filename: df.sh

/bin/df -h > /home/pi/df.txt

Here, the human readable output is sent to a local file for a later scheduled email.

Periodically I would then manually ssh in and copy the images to another computer and free up space on the Pi and the USB drive.

Daily emails

I wanted the day’s thumbnails emailed to me everyday as confirmation that it’s all working correctly. ssmtp does the emailing and mpack enables attachments to emails.

sudo apt-get install ssmtp mpack

The email sending needs a mail server. Strangely, sending to a gmail address using the gmail server wasn’t working. I’d get permission and authentication errors. However I did succeed sending to a gmail address using a yahoo account for the server. The ssmtp config looks like this.

cat /etc/ssmtp/sstmp.conf

root=my_address@yahoo.com
mailhub=smtp.mail.yahoo.com:587
rewriteDomain=yahoo.com
UseSTARTTLS=YES
AuthMethod=LOGIN
AuthUser=my_username
AuthPass=my_password
FromLineOverride=YES

The actual emailing an attachment looks like this:

#!/bin/bash
#Filename: email.sh

DATE=$(date +"%Y%m%d")
EMAIL=my_address@gmail.com
/usr/bin/mpack -s "Daily thumbnail" -d /home/pi/df.txt /home/pi/thumbnails/$DATE.jpg $EMAIL

Here the body of the email is made from the contents of the file df.txt, described above, and the attachment is the thumbnail image, having a filename formatted with today’s date.

Additional help: Send emails with attachments from the Linux command line

Scheduling

Putting it all together into cronjobs gave me a crontab listing as follows:

crontab -l

# m h dom mon dow command
0,30 12-14 * * * /home/pi/scripts/photo.sh
0  15 * * * /home/pi/scripts/thumbnail.sh
5  15 * * * /home/pi/scripts/backup.sh
29 15 * * * /home/pi/scripts/df.sh
30 15 * * * /home/pi/scripts/email.sh

Here, a photo is taken on the hour and half-hour between 12pm and 2.30pm. At 3pm a thumbnail would be made, at 3.15pm the backup would be made on the USB drive. The current disk usage would be saved to file a minute before being sent as an email together with the thumbnail as an attachment.

Merge into a video

After a year of the above I had all the needed photos. To accumulate images into a video I used ffmpeg, this time on a Linux VirtualBox instance.

sudo apt-get install ffmpeg

I copied all the same time slot images to their own directories and renamed them with a sequential identifier. ie. I’d have all the 12pm photos in one directory named 1200_1.jpg, 1200_2.jpg, 1200_3.jpg … 1200_365.jpg, etc. The same for the 12.30pm, 1pm, 1.30pm, etc. photos.

ffmpeg -r 15 -start_number 1 -i 1200_%d.jpg -s 1280x960 -vcodec libx264 ../garden_1200.mp4

Here, the images with filenames starting with identifier 1 are stitched together with a frame rate of 15, a 1280×960 size and x264 encoding and sent to an output .mp4 file.

Conclusion

I was expecting the changing foliage over the seasons to be the dominant feature. Instead I find the changing length of the shadows over the seasons to be more impressive.

Disappointing is the flicker of shadows that occurs between overcast days and sunshiny days. On overcast days there are no shadows from the trees. When followed by a bright day having the tree shadows, then the flicker caused by shadows disappearing and appearing again causes the flicker.

Post-processing won’t help, it’s not the contrast or brightness at fault, it’s the lack of shadows. I thought there’d be sufficient variation in the six photos each day for me to choose the brightest one, but typically if there are no tree shadows in one photo, there won’t be any in others of that day.

A fun project.

Published article

I wrote an article and published it via LinkedIn.

4 ways to keep up to date with C++ news

It got a few view and a few likes which is gratifying. This was purely because of sharing it to a C++ Developers LinkedIn group.

Keeping up to date with C++ news is important to me and I think it’s important to try share information. If it happens to promote myself at the same time, then all the better.

Building PCL with Qt support

Point Cloud Library (PCL) offers pre-built binaries but these don’t include Qt support. For this you need to build PCL from source. Building PCL from source with Qt support is quite an undertaking as there are many dependencies. This post documents the steps I took to build it.

You need to decide from the outset whether you want a x86 or x64 build of PCL because every dependency must be of the same type. So it influences your choice of download and build of boost, Qt, flann, etc.

Your choice of Qt is important here. The x86 or x64 version of Qt will build the same type of Qt .dlls irrespective of what VS compiler you set it to use. Use the same architecture throughout.

Choice of version of Qt and VTK
You need to go with one of the following version combinations.
VS 2013 + Qt 5.5 (or below) + VTK 6.3 (or below)
VS 2015 + Qt 5.6 (and up) + VTK 7.0 (and up)
This is because of a deprecated feature (QtWebKit) in Qt 5.6 which impacts on what can be built. The installers of Qt have version 5.6.2 as the first one that supports VS 2015.

Combinations of dependencies found to work:
PCL 1.8.0
Qt 5.6.2 x64
Boost 1.59 x64
Eigen 3.2.10
Flann 1.8.4
VTK 7.0.0
CMake 3.6.2 x64
Visual Studio 2015 Community

Boost is installed with a pre-compiled binary, which installs for example like this.

C:\
--boost\
----boost_1_59_0

Qt is also installed with the pre-compiled binary

C:\
--Qt\
----Qt5.6.2

Eigen is installed by simply copying files

C:\
--eigen

CMake
CMake-gui is built with a self-executable, choosing the option to add CMake to $path. If you’re unfamiliar with CMake (as I was) then it works like this: Place the downloaded source in one directory. Make another directory for where the build files will be created and where the build will take place. Open CMake and specify these two directories appropriately. Press Configure. You’re asked what generator to use. Choose Visual Studio 2015 x64 to create Visual Studio .sln and .vcxproj files configured for an x64 build. Continue refining the option entries until pressing Configure gives no errors, then press Generate. You then have a Visual Studio solution which can be opened and built using VS.

Flann is configure with CMake and built with Visual Studio. x64 compiler flags. Used default CMake options. The INSTALL project in the VS solution is then built to install the libraries to Program Files. I manually moved files to separate the Release and Debug version of the .dlls and .libs. I think this was necessary for PCL 1.7, but not sure for 1.8

C:\
--Program Files\
----flann\
------bin\
------lib\
------bin_d\
------lib_d\

VTK is configured with CMake. Enable the Qt options. Then build using VS, both the Release and Debug congurations, but don’t install yet. Building debug and release libraries of VTK presents difficulties which need to be handled carefully. We’re going to make use of the build directory still.

PCL
PCL is configured with CMake. For FLANN library I used flann_cpp_s because of advice here. I got CMake errors where not all boost libraries were found. I had to add an entry for the BOOST_LIBDIR directory. For VTK_DIR point to the VTK build root directory. Open Visual Studio as Administrator. Select all pcl projects, right click Properties > Debugging > Environment and set to

PATH=C:\vtk\VTK-7.0.0-build\bin\$(OutDir);%PATH%

Do this for both Release and Debug congurations. In this way when the compile needs the appropriate VTK library the path will be pointing at the appropriate build library depending on the active configuration.
Build both Release and Debug congurations.
A build error:

C:\Program Files\flann\include\flann/util/serialization.h(18): error C2228: left of '.serialize' must have class/struct/union;

solution here.
Another build error:

error C2440: Conversions between enumeration and floating point values are no longer allowed

Solution: Modify this:

static_cast<LookUpTableRepresentationProperties>(value);

to

static_cast<LookUpTableRepresentationProperties>(static_cast<int>(value));

and build the INSTALL project.

C:\
--Program Files\
----PCL

VTK
Reopen the VTK.sln in Visual Studio as Administrator. Build the INSTALL project to install both Release and Debug configuration but with manually creating Debug and Release for bin/ and lib/ subdirectories and moving files to create following structure.

C:\
--Program Files
----VTK
------bin
--------Debug
--------Release
------lib
--------Debug
--------Release

The reason for doing the install at all is simply convenience. It makes it intuitive to find the .dlls and .libs again, and the build directory can be removed.

Dependency Walker will now show for any of the PCL .dlls that their dependent VTK .dlls are not available. But that’s OK. The PCL .dlls have _release or _debug in their filenames, so you can change %PATH% to point to c:\Program Files\PCL\bin. The VTK .dlls unfortunately are not so well named, so they need to be copied side-by-side with your application’s .exe.